greybeard
Well-known member
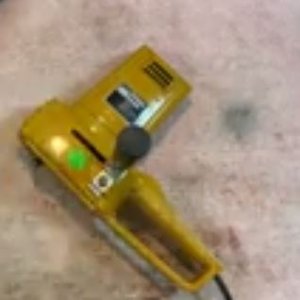
It's been a minute or 2 since I made/formed a set of brushes for an electric motor. Older Montgomery Wards PowerKraft rotary sander/polisher.
Not this exact model, but very close.

I used it last summer and it worked ok for several hours but sparked a good bit from the brush area, then would Start, stop, then finally stopped altogether. The brushes are just worn down to almost nothing. The way the brush holder is made, when the brushes wear down, the conductor (wire) hits the end of the slot in the top of the brush holder and there is no more spring tension pushing the brush up against the commutator.
Been unable to find exact replacement brushes and not knowing what the correct length is supposed to be, had to buy locally, two brushes 1/4x/1/4" x 3/4" long which is correct width-height but way too long
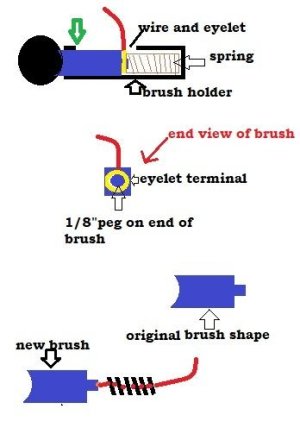
The original set up is kind of funky. Instead of the brush having a conductor factory made on to the end of it, enclosed by a spring, it's just a rectangle, with an 1/8' round peg on one end that an eyelet terminal fits over, and the spring also goes over the end of the peg, which holds the wire eyelet up tight on to the brush.
The new brush I had to get tho, has the usual brush, conductor and spring all in one. Looks like this:

There's just not enough room in there to make a splice connection plus, with thespring too long, even after I cut the brush down to a guestimate of how long it should be, the spring would still be too long to all fit in the holder.
My intention is to cut the conductor completely off the end of the new brushes, scrap the spring and use the original eyelet over the little peg on the end of the new brush and use the original springs.
Here's basically what the original design is. When the brush wears down, the wire ends up against the end of the slot where the green arrow is.(black circle on far left is the armature's commutator)

So, my questions.
1. I'm having to guess on the correct brush length but I hope that as long as I make both brushes equal length, the spring tension on each will be equal. Does it make much difference how hard the spring pushes the brush against the commutator?
2. Since I have to shorten the brushes on the commutator end in order to retain the round peg on the spring end, do I need to form a radius on the other end of the brush or leave it squared off and let it seat itself against the commutator thru wear?
3. The commutator is dirty and the grooves are filled with gunk. What do I use to polish the commutator?
Yes, I know, I can buy a new rotary sander dirt cheap nowadays but I'm old and I just wanna keep this one, even tho I rarely use it since I have belt and random orbit sander already.
(besides, I already have $16 in the 2 new brushes and there's no return on electrical parts at my local hardware store.)
Not this exact model, but very close.

I used it last summer and it worked ok for several hours but sparked a good bit from the brush area, then would Start, stop, then finally stopped altogether. The brushes are just worn down to almost nothing. The way the brush holder is made, when the brushes wear down, the conductor (wire) hits the end of the slot in the top of the brush holder and there is no more spring tension pushing the brush up against the commutator.
Been unable to find exact replacement brushes and not knowing what the correct length is supposed to be, had to buy locally, two brushes 1/4x/1/4" x 3/4" long which is correct width-height but way too long
The original set up is kind of funky. Instead of the brush having a conductor factory made on to the end of it, enclosed by a spring, it's just a rectangle, with an 1/8' round peg on one end that an eyelet terminal fits over, and the spring also goes over the end of the peg, which holds the wire eyelet up tight on to the brush.
The new brush I had to get tho, has the usual brush, conductor and spring all in one. Looks like this:

There's just not enough room in there to make a splice connection plus, with thespring too long, even after I cut the brush down to a guestimate of how long it should be, the spring would still be too long to all fit in the holder.
My intention is to cut the conductor completely off the end of the new brushes, scrap the spring and use the original eyelet over the little peg on the end of the new brush and use the original springs.
Here's basically what the original design is. When the brush wears down, the wire ends up against the end of the slot where the green arrow is.(black circle on far left is the armature's commutator)

So, my questions.
1. I'm having to guess on the correct brush length but I hope that as long as I make both brushes equal length, the spring tension on each will be equal. Does it make much difference how hard the spring pushes the brush against the commutator?
2. Since I have to shorten the brushes on the commutator end in order to retain the round peg on the spring end, do I need to form a radius on the other end of the brush or leave it squared off and let it seat itself against the commutator thru wear?
3. The commutator is dirty and the grooves are filled with gunk. What do I use to polish the commutator?
Yes, I know, I can buy a new rotary sander dirt cheap nowadays but I'm old and I just wanna keep this one, even tho I rarely use it since I have belt and random orbit sander already.
(besides, I already have $16 in the 2 new brushes and there's no return on electrical parts at my local hardware store.)
